
Recording Audio of an ORR Session
Digital Oral Reading Records provides the option to record the audio of a reading session.
This gives teachers a reference to play back while marking a student’s reading behaviors. It also allows students to take assignments on their own — they record themselves reading the passage, see questions (with audio provided) and record their answers, too. Teachers can mark reading behaviors later, on their own time.
If you expect your student to record themselves reading independently, you’ll need to make sure that the student’s microphone is enabled on their device. Skip to “Help your Student Configure their Microphone” for help.
If you're looking for a particular section about Recording Audio, use the links below to quickly move to that section:
Getting a Student Ready to take a Reading Assignment
Assigning the Reading Assignment
The Student Audio Section for Teachers
Help your Student Configure their Microphone
Getting a Student Ready to take a Reading Assignment
You should always give a student a bit of explanation on how to take a reading assignment on their own, before they get started. Here are a few tips:
- You might want to ensure that they have their microphone enabled and functioning on their device. See Help your Student Configure their Microphone below for help. Students will need a device with a functioning microphone if you want them to take the assignment independently.
- It’s good to be familiar with what the student will see. Check out the Student Help page.
- Show the student how to navigate the Microphone Check. They’ll see this when they open the assignment.
- Explain to the student how the recording button works. If you’ve assigned the assignment via the “Send to Student to Take on their Own” option, the recording button will automatically be active and automatically recording when the student starts the assignment.
- The most important thing is for the student to read out loud. If the student doesn’t read the entirety of the Passage and their answers to the questions out loud, you won’t be able to mark their reading behaviors.
- Tell the student how to use the green Page Turn arrows to flip through the pages.
Assigning the Reading Assignment
If you want the student to take the assignment on their own, make sure you select “Send to student to take on their own” when creating the assignment. That way the recording button will already be active and recording when the student opens the assignment — they won’t have to touch it.
If you select "Send to student device”, the student can still record themselves but the button won’t be active when students open the assignment. The student will have to click Record.
Learn more at Create and Edit Reading Records Assignments.
Checking your Microphone
When you open an Oral Reading Record, we’ll ask if you want to record during that session.
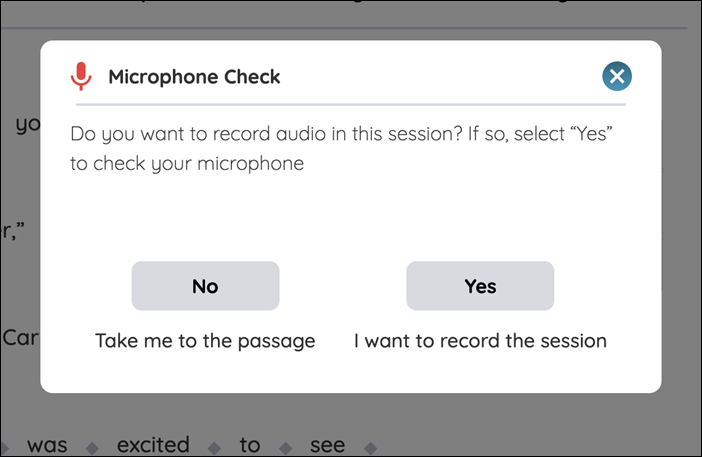
If you say No, you can still use the record function, but you will not see the microphone check.
If you say yes, you’ll see the first step of the microphone check. Select the record button and we’ll start automatically recording to test your sound. Be sure to allow the microphone on your browser when prompted:
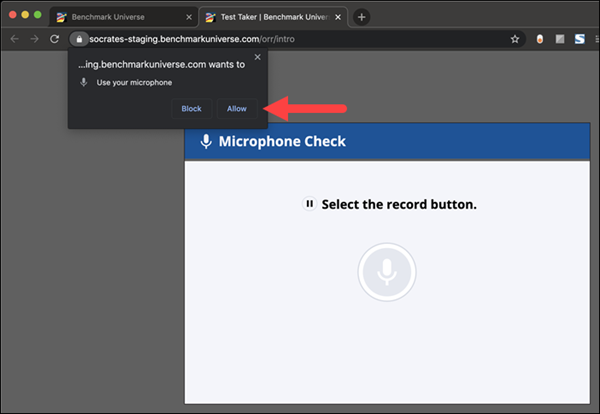
Press the play button to play the sound back. If you can hear it, hit the thumbs up button. If you can’t, hit the thumbs down and try again. If you still can’t hear it, you might need to adjust the volume on your device or adjust your browser preferences. For more help, see Help your Student Configure their Microphone.
The Student Audio Section for Teachers
Find the Student Audio section in the sidepanel on the right in under the Student Audio section. It is displayed on the Passage, Retell, and Comprehension pages. You and/or your student can record audio during the session, which will appear for you in this Student Audio section.
- If you assigned the text for students to complete on their own, the student audio will appear in this section.
- If you work with students one-on-one, you can record the session here.
Once some recordings have been created, you’ll see those on the Analysis and Summary pages, too.
Recording Tool
Select the recording button to start recording. You’ll know it’s recording when the button turns red and you see the blue circle animation, like this:
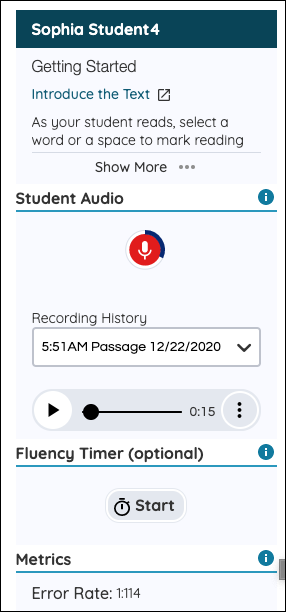
As soon as you start recording, you’ll see the Playback Tool appear, including your new recording in the Recording History dropdown. As your recording gets longer, we’ll add seconds to the duration in the playback tool (in :05 increments).

|
There is no limit on how long you (or your student) can record, but after ten minutes, of Recording within the same step (Passage, Retell, or Comprehension), we’ll start a new recording to make it easier for you to review the audio later. |
If you need to pause you recording, it will look like this:

To start recording again, just select the record button again. We'll add the new audio to the end of your current file.
If the recording button is active, we’ll continue recording as you go from step to step through the Retell and Comprehension questions. We'll automatically save the audio as you go, creating a new audio clip as you progress through each step of the assignment. That way, your student’s audio will be neatly organized by section.
|
|
The Student Audio recording clips work the same way. If a student recorded themselves reading, you’ll see the recordings organized into the Recording History dropdown on the Passage, Retell, and Comprehension pages separately. |
You can always play around with the recording tool in our Practice Section to see how it works before you use it with a student. Learn more about the Practice Section.
Playback Tool
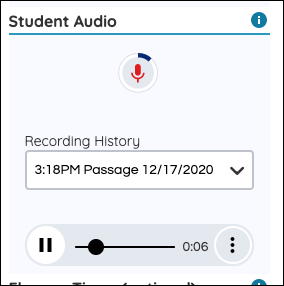
If there are multiple recordings, you can select the one you’d like to hear from the Recording History dropdown.
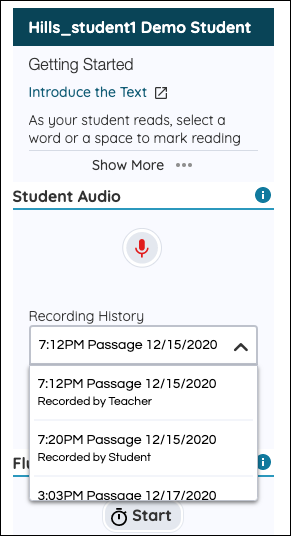
Each recording lists the time it was created, the step on which it was created (Passage, Comprehension, or Retell), and the date it was created.
It will also say “by teacher” or “by student” to indicate whether the recording was created using the teacher’s recording tool or the student’s device.
If a student just made a recording and you don’t see it yet, refresh the page.
To listen to the selected recording, select the play button. Select it again to pause the recording. You can drag the dot to skip ahead or back through the clip:
|
|
If you play a clip while the recording button is active, it will pause the recording. |
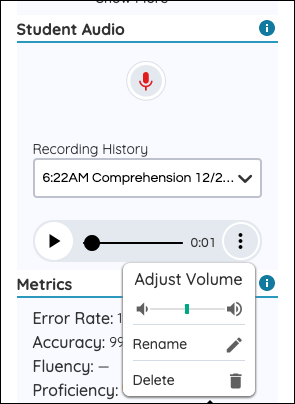
Select the three dots on the right of the playback tool if you’d like to change the playback volume, rename the audio clip, or delete the clip. You’ll need to confirm your deletion, because deletion of an audio clip is permanent:
On the Analysis and Summary steps, we’ll combine all your recordings into a single list, organized by the time they were created.
Sometimes you’ll see this when you go to play a recording:
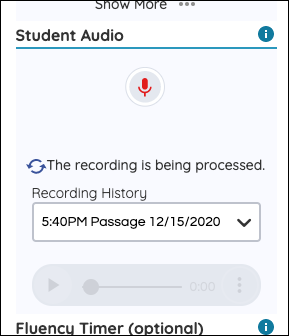
That means we’re still saving your recording. Either refresh the page in a bit or come back later to access the recording. And don’t worry, you can always create a new recording while that recording is being processed!
If you see this, it means your recording failed to save:
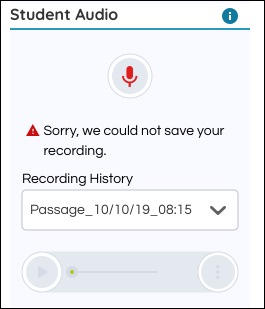
We’re sorry! There might be a problem with your internet connection. Check your connection before you try to record again.
Help your Student Configure their Microphone
If you expect your student to record themselves reading, you’ll need to make sure that the student’s microphone is enabled on their device. Make sure beforehand that a student knows to select “Allow” when prompted.
These tips will also help you enable your microphone on your device as a teacher.
When you first try to use your microphone on Benchmark Universe, all browsers will show a modal like this:
Hit “Allow”. If you (or the student) accidentally select “Block” or “Don’t Allow”, don’t worry! Read below to learn how to manually enable your microphone on different browsers.
Google Chrome: Enabling Microphone Permissions
In the URL bar, at the left of the URL, you'll see a Lock Icon. Click on the icon to open the permission window.
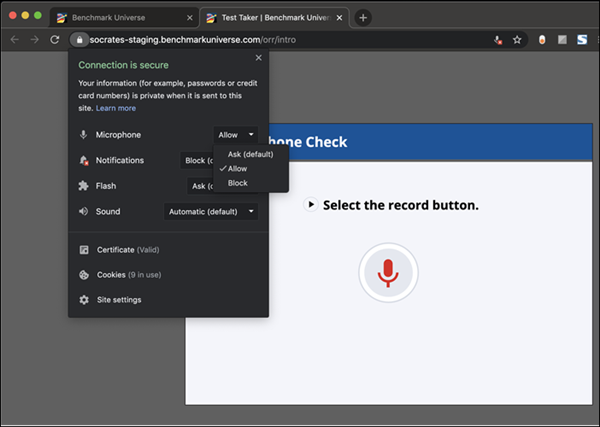
For Microphone settings, select Allow from the dropdown.
Firefox: Enabling Microphone Permissions
In the URL bar, located to the left of the URL, you'll see a Lock Icon. Simply click on the icon to open the permission window.
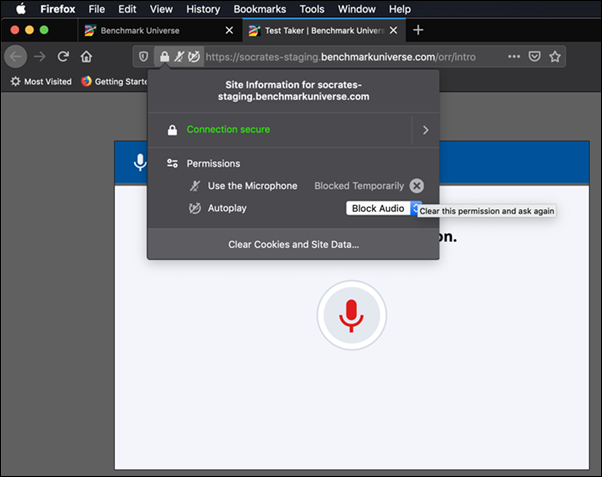
Ensure that the Use the Microphone options under Permissions are set to Allowed.
In the case that they aren't, simply remove that setting (using the X next to current status) for Use the Microphone.
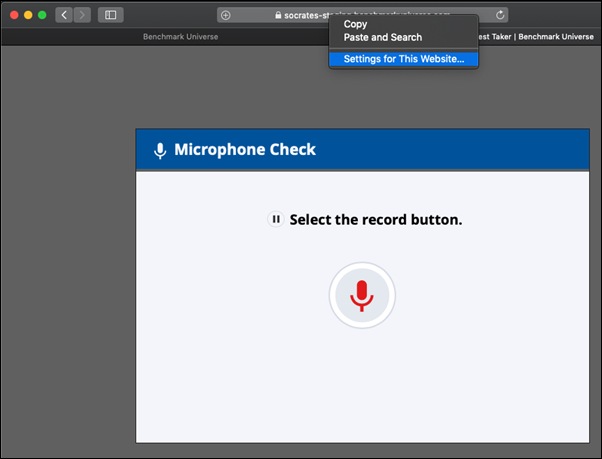
Safari: Enabling Microphone Permissions
Start by secondary clicking (right-click or control-click) on the URL bar. From there, select the Settings for This Website... option.
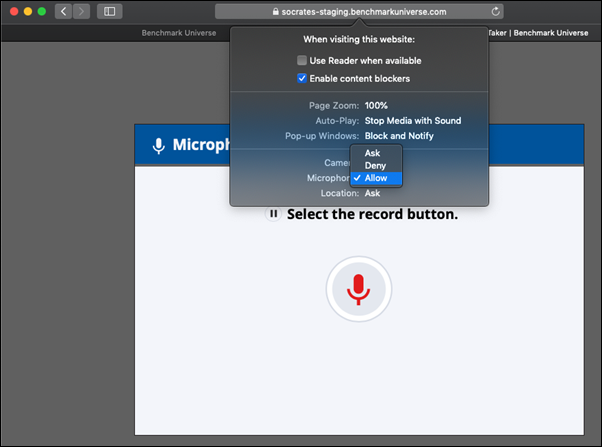
This will open up the permission window. For Microphone settings, select Allow from the dropdown.
Microsoft Edge: Enabling Microphone Permissions
In the URL bar, at the left of the URL, you'll see a Lock Icon. Click on the icon to open the permission window.
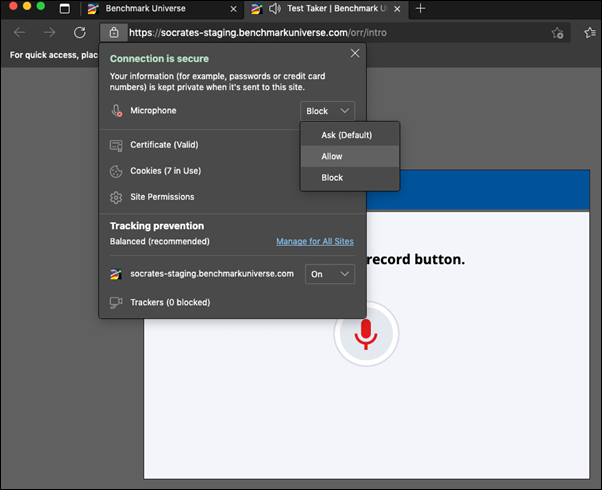
For Microphone settings, select Allow from the dropdown.
Still Having Issues?
- If your microphone is enabled, but you still can’t hear your recording, be sure the volume is turned up on your device.
- Check “Sound” in your System Preferences to be sure the Sound Output volume is turned up.
Last Updated: December 22, 2020